Taking the Garage into the Classroom
SMALL SCALE WINEMAKING COURSE
3-5 August 2018
http://www.sun.ac.za/english/faculty/agri/viticulture-oenology
http://www.sun.ac.za/english/faculty/agri/viticulture-oenology/Documents/Garagiste%20Winemaking%20Course%202017.pdf
www.garagiste.co.za
https://cheesemaking.co.za/
Experience: 4/5
It has been many years since I sat before a Professor in a University Lecture Room. Thankfully so but, best of all, there were no exams at the end of this Course. This was no regular varsity course either or, to large extent, a regular Professor. This was ‘The Wine Prof’ aka Professor Wessel du Toit from Stellenbosch University’s Department of Viticulture and Oenology. The 3-day course was the ‘Small Scale Course in Winemaking’ that is colloquially known as the ‘Garagiste Course’. I was super eager to attend. Not only do I have pretentions and aspirations one day to make my own wine but I had had to cancel my booking for this annual course a year ago due to a clash with my Cape Wine Academy training. The course content was advertised to include:
- Different grape cultivars and characteristics
- Ripeness and quality parameters of grapes and harvesting of grapes
- Crushing, de-stemming, pressing and juice treatments
- Alcoholic fermentation
- Skin contact in red wine and different colour extraction methods
- Malolactic fermentation
- Racking and fining of wine
- Ageing of wine in oak barrels and alternative oak products
- Stabilisation and filtration of wine
- Sparkling wine, semi-sweet and noble late harvest wine production garagiste style
- Port production garagiste style
- Bottling of wine
- Additives that can be added to wine
- Problems that can arise in small-scale winemaking and how to solve them
- Wine tests that can be done at home
- Equipment used in small-scale winemaking
- Suppliers of small-scale winemaking equipment
For those not in the know, garagiste literally means a ‘garage mechanic’ or ‘garage owner’. Every good story begins with a rebel. For the garagistes this was Jean-Luc Thunevin. In 1991 Bordeaux, he was a successful St Emilion wine merchant who sold grand wines from the surrounding vineyards. He founded Château Valandraud in an old garage in the back streets of St Emilion. The true garagiste, he said, is someone with “no money, no big vineyards. He has to do the best he can because he has to live off the sale of 3,000 bottles”. Five years later one of Jean-Luc’s wines was rated higher than the legendary Château Petrus. Can you imagine the shock waves this must have sent through the French wine establishment?
Garagiste winemaking started in South Africa soon after. Cathy Marshall was first, starting the Barefoot Wine Company in Muizenberg in 1995. Clive Torr set up Topaz Wines shortly afterwards, making Pinot Noir from just 400m2 of vines near Somerset West. Since then, the movement has considerably expanded. I heard recently that there are 34 garagistes in Durbanville Hills alone but unless you’re a member of Garagiste Movement in South Africa you will never know about or get to know.

Officially, a commercial garagiste, as opposed to a home winemaker, must: be the sole financier and winemaker; produce less than 9,000 litres per year; and be certified by SAWIS (the South Africa Wine Industry Information & Systems, who administers inter alia the Wine of Origin system). I have tasted at 2 commercial garagistes – Bemind Wyne in McGregor and Sonklip Wyn in Stellenbosch. Both winemakers reassured me that it was quite possible not to make very expensive vinegar and so now was the time to find out.

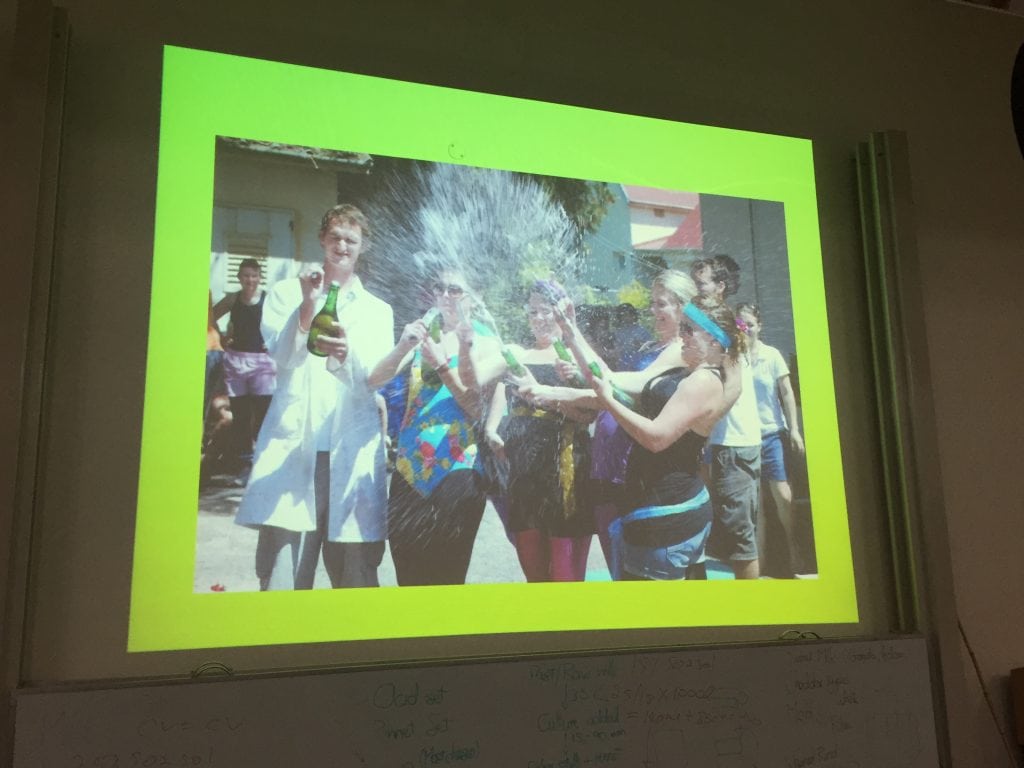
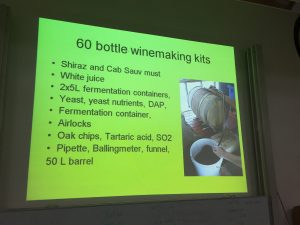
The 3-day Course was held over a weekend, beginning with Friday evening (6.00-9.30pm) and taking all day Saturday (8.30am-4.00pm) and Sunday morning (8.30am-2.00pm). I opted in for the cheese and wine social event on Saturday evening, as did most of my future winemaker colleagues. The Course has been run for 8 years and attended by over 1,500 people. It is aimed for those wanting to produce their own wines from 20kg to 1-2 tonnes of grapes. The fee (R4,000) included a comprehensive set of notes (in English or Afrikaans), details of small winemaking suppliers, a NQF Level 6 Certificate, a bottle of wine bottled during the course, all refreshments and wine tastings, as well as the social event.
Friday Evening
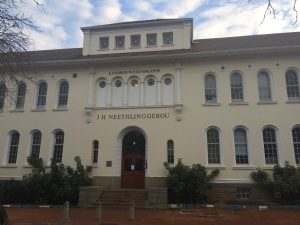
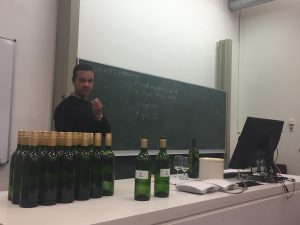
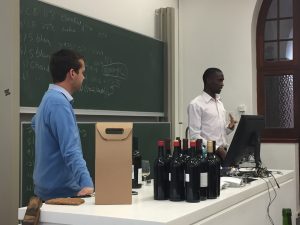
I knew where to go in Stellenbosch as I had been before for the Short Course in Wine Evaluation. Registration was easy and I made my way into the Lecture Hall, course notes in hand, to meet some of the other 40 or so students. As the ‘Wine Prof’ introduced himself we did so also. We had come from far and wide – Malawi (from Linga Fruit Wines) and the USA, together from all over South Africa (Cape Town, Somerset West, Wellington, Barrydale, Jeffrey’s Bay, Graaff Reinet, Durban, Joburg and Mpumalanga) such is the prestige and reputation of the Course. The reasons for attending were as varied as the locations, ranging from ‘enthusiastic amateur wannabe winemaker’ to ‘in the wine industry’, ‘I’m a molecular biologist’, ‘retired and wanting to learn to make wine’, ‘wanting make better wine’, ‘I’m a wine tour guide’, ‘my father wants me to make wine’ and even ‘to get away from my mother-in-law’!

It is a truism that all great wines are made in the vineyard. Viticulture was thus where we started, with the Wine Prof controversially mentioning the Californian start-up that has just produced the world’s first synthetic wine in the laboratory. ‘Very nice acidic soup’, he called it. I doubt that the marketers who right the synthetic words on wine labels and tasting notes would ever be so honest! ‘What happens when you plant a Sauvignon Blanc seed?’ asked the Wine Prof. Well, you don’t get a Sauvignon Blanc vine. You get Vitis vinifera instead, that is the common grape vine used for wine grapes, table grapes, grape juice and raisins. Cloning has been used for over 5,000 years to produce the 5,000 to 10,000 grape varieties that there are today. The world’s oldest vines are in Slovenia and 380 years old. Australia, I learned, has some vines that are 130-140 years old, aided by the fact that the phylloxera louse never reached them. The pest is the reason why 95% of South Africa’s vines are grafted.

Next, we covered the growing cycle of the vine and the constant balance needed between stem and leaf production for the plant to reach light but too vigorously so that no grapes are formed. The vine needs to struggle a bit otherwise it loses fruit which is why pruning and canopy management in the vineyard are so important. We covered bud break and flowering, and the damage caused by fungus and the leaf-roll virus. That is why Stellenbosch Cabernet Sauvignon vines average only 17-18 years old. Veraison, the onset of ripening, follows setting. Skin colour changes with many grapes forming red skins albeit the juice is clear. A little known fact is that Roobernet – similar to Pinotage and developed in the 1960s as a cross between Cabernet Sauvignon and Alicante Bouschet – unusually has red flesh and juice.
The Wine Prof then explained what a cultivar and a clone are. A ‘cultivar’ as distinct from a naturally-occurring ‘variety’ is a ‘cultivated variety’ that has been selectively bred for specific purposes. A ‘clone’, on the other hand, is a ‘vegetative ascendant from a single mother plant that has been asexually produced and therefore genetically identical’. It is essentially a sub-category of a variety.
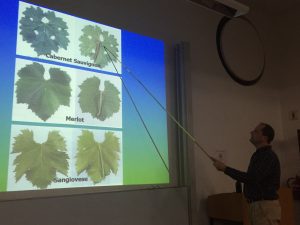
We then turned to cost and other considerations for vine growing. These included the site itself (the macroclimate, topography, altitude, soils, local breezes etc); the target market; the availability of plant material and grapes; what is needed to start a vineyard (land, vines, trellising, soil preparation, irrigation, labour etc); and the cost of grapes. The characteristics of each of the major grape cultivars were described after, together with the advantages of bush vines and canopy opening. Chardonnay was recommended for the garagiste as it is not so sensitive in winemaking. Chenin Blanc is versatile but Sémillon is easy to make on a small scale. Pinotage is the chameleon of the wine industry. Warm and dry conditions give the ‘duco’ (lacquer) character whilst softer ripening gives fruitier, floral wines. Merlot is sensitive to drought but Pinot Noir needs cold night temperatures for a good deep colour. Cabernet Sauvignon has a wide range of flavours (clones). Syrah is pepper spicy from cooler areas but more meaty in warmer areas.

After a short break, we returned to the business of small scale wine-making. A quick intro about the winemaking units for acidity (g/l), sugar (°Balling or °B), SO2 (ppm) and alcohol (% by volume) set the scene for the rest of the day’s lecture. The Wine Prof covered topics such as grape ripeness and quality, sampling procedure, composition of the grape berry, grape sugar at harvest, titratable acidity, harvest considerations and optimum ripeness, phenolic development, grape appearance, aromas and flavours, and hand/mechanical harvesting. There was advice inter alia on the °B to pick white and red grapes at, how tannins polymerize, the different factors that affect optimum ripeness, and more besides.
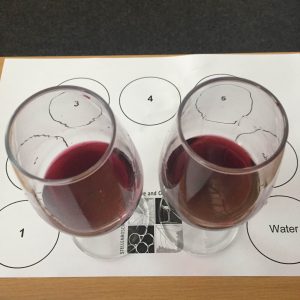
The day ended with tastings in the Tasting Laboratory to demonstrate different tastes and smells. Each tasting pairing showed a difference in a particular factor. The first flight contained water alone and water with 5% grain alcohol added. This showed how alcohol is sweet and brings a fuller, slightly oily and fuller texture. The different tastes of tartaric acid (bitter) and malic acid (bitter and sour) were compared in Flight 2. The next flight built on the second flight in that glucose and fructose were added to water containing citric acid. Both were bitter and sour but the glass containing the fructose appeared sweeter.

The 3 remaining flights focused on smells. The first 2 glasses contained methoxypyrazines – the chemical compounds that produce odours – that are found in grapes and wine. They typically produce the green, herbaceous or vegetative notes to a wine. The Wine Prof had added IBMP, one of these compounds to one glass. To the other, he added a 3MH which is a thiol (thiols are a sulphur analogue of alcohol) that gives either guava or passion fruit aromas to a wine, depending on the concentration. The first wine smelled of green pepper (I was correct in my analysis) and the second tomato (I was wrong).
The clever Wine Prof added terpene to water in the next glass and iso-amylacetate to the other. I picked out the orange and Clementine aromas in the first but detected marzipan, almond and acetone smells for the other. The terpenoids are characteristic of many white wines: Chardonnay, Chenin Blanc, Sémillon, Riesling and Gewürztraminer. The second smells were from the iso-amylacetate, which is an ester that gives a wine fruit and other flavours – apple, peach, banana, acetone and nail polish – which are produced by yeast from amino acids during fermentation, especially at lower temperatures.
The final pair of tastings contained one glass with smells of lavender and violets, from bionone and rotundone, which can be found in Shiraz. The last glass had odours of coconut and woody, nutty vanilla that are associated with wood barrels and whisky (Lactones).

The first day of the Course, that was just a few evening hours, was fascinating and not least the tasting exercises at the end. It was late when I returned to Cape Town but I left excited for the next morning.
Saturday
I arrived invigorated for a full day of learning. I even managed to park inside the security gate for the University building (the Joining Instructions advised to park outside on a grassed area at the nearby road junction that was out of site and did not seem very secure). 8.30am still seemed very early for a Saturday morning after the drive from Cape Town.

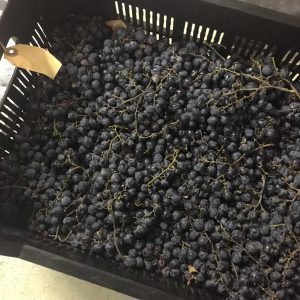
Last night was all about the vineyard and the grapes. The attention of the morning turned to the cellar and the detailed processes that are involved in winemaking. The Wine Prof began with crushing and de-stemming. The aim is to extract the juice but without too much tannin. The grape skins need tear a little though. Whole berries can be fermented if you wish for a fruitier and less tannic wine. As ever, it is the side information that can be the most useful and practical. It takes 2 hours to crush 100 kg of grapes by hand or foot, which is the smallest viable amount to make red wine. A small-scale crusher costs between R10,000 and R25,000. Each vine produces 0.5 kg up to 2-3 kg of grapes which equates, in Stellenbosch, to R4,000 to R20,000 per tonne. If buying, one should aim to pay R7,000 to R8,000 per tonne.

Pressing comes next. White grapes need skin contact for flavour but not for too long or else too much tannin is extracted. Temperatures can rise too due to spontaneous fermentation. This can lead to a slimy must that makes juice extraction difficult. It is best to press at 10-15°C and for no longer than 12 hours after crushing. Red wines are usually pressed at the end of fermentation as the alcohol that has formed breaks down the pectins to make the skins less slimy. Wine colour can be manipulated by using either ‘free run juice’ or ‘bleeding’ juice to increase the skin: juice ratio. I learned about equipment and pressures. A sieve can be used to hand press up to 120 kg of grapes (about 50 l in volume) that will give 45 to 55 l of juice. A small-scale basket press is advised for any greater amount, using a single press of 0.5 bar for white grapes and 1-2 bar for red grapes (1 or 2 presses depending on colour preference).

The juice is then settled to remove solids to clear the juice. This best done overnight at a cool temperature (10-15°C) to slow fermentation. Pectolytic enzymes and SO2 are added before the settled, clear juice is ‘racked’ off (siphoned) into 20 l buckets, or larger. The Wine Prof then explained the intricacies and the importance of acidity which now needs to be adjusted. Wine contains different types of acids, mostly tartaric, malic, succinic, ascorbic and acetic acid. Three terms are used to describe: Volatile Acidity (VA), which can be removed from wine by distillation and which is mostly acetic acid; Fixed Acidity (FA) which is either mostly tartaric and malic acids (if the wine has not undergone malolactic fermentation, or MLF) or tartaric acid and lactic acid (if the wine has undergone MLF), which cannot be removed; and Titratable Acidity (TA) which is the sum of VA and FA.
There is a lot of chemistry here. The acid concentration in South Africa is often too low. This means that either tartaric (usually) or malic acid must be added to the must to adjust the pH level to the right amount. Wine has a pH of between 2.8 and 4.2. There are many reasons why maintaining a low pH is important. Sulphur dioxide, which cuts microbial activity by spoilage organisms, works better at low pH. Lower pH wines oxidise less and keep better in the bottle. The colour of red wines is better at lower pH as it favours red anthocyanins over blue ones. A low pH is also favourable for wines such as Sauvignon Blanc as less fining is needed for protein stability.
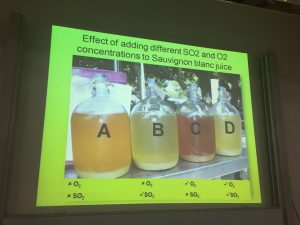
The Wine Prof explained the different characteristics of ‘oxidative’ versus ‘reductive’ winemaking. It is best to keep oxygen out as too much makes for brown wines with too much acetaldehyde. Oxygen can be removed in varying ways: keeping temperatures low; adding dry ice while pressing and crushing, or to receiving tanks while racking; adding ascorbic acid or SO2 to the must; or purging with inert gasses such as nitrogen or carbon dioxide.
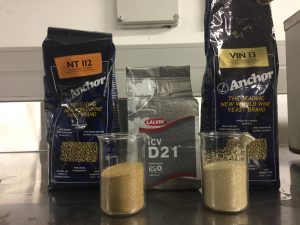
Alcoholic fermentation (as distinct from MLF) is the process whereby yeast converts grape sugars into alcohol and other products. It is, together with grape quality, the most important factor to make good wine. I learned about the different types of natural and commercial yeasts. Saccharomyces cerevisiae is naturally found and is also bought as active dry wine yeast (or ADWY). I learned that the eventual alcohol concentration of the wine is 0.58 x °B. Yeast needs nutrients – nitrogen in the form of ammonium and amino acids – and especially at the start of fermentation or else it can become ‘stuck’. Diammonium phosphate (commonly known as DAP) is added on the 2nd and 3rd day of fermentation. DAP also helps prevent the yeast from making unwanted H2S that can give wine a smell of rotten eggs.

Yeasts can have a large effect on wine aroma and flavour too as they form esters and higher alcohols. Esters can give whites wines fruity flavours and the banana character of Pinotage, as I discovered in the smell tastings last night, while the higher alcohols can give white wines added complexity. Meanwhile, the Wine Prof offered tips on how to rehydrate and add yeast, how to manage temperature control for white and red wines (ferment at 10-15°C and 22-30°C, respectively), and container types. White wines are best made using demi-johns with airlocks (the escaping CO2 purges oxygen) with open 20 l buckets being best for red wines.
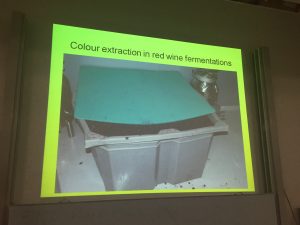
We then learned about the risks and needs of natural fermentation – which uses natural yeasts – and how less consistent and more difficult it is to control compared with barrel fermentation using commercial yeasts. The last topic before the morning break – phew! – was colour extraction for red winemaking. Colour is extracted first during fermentation (as it is more water soluble), then skin tanning and, last, seed tannins. The CO2 formed during fermentation forces grape skins to the top of the must to form a skin ‘cake’. This needs mixing and a number of techniques are commercially used and available to the garagiste. The most common and easiest technique is manually to push the cake down using a broom with a wide round base. This is done 4 to 5 times daily. Another way to increase red wine colour is to ‘cold soak’ the must at around 8°C for a few days after crushing and before alcoholic fermentation. Using this approach, anthocyanins but not the tannins are extracted.

The morning coffee break was especially welcome after so much theory in the classroom. The rest of the morning was spent with visits to the laboratory. There were 3 stands: Kose, a PhD student from Spain, showed us how he analysed wine to measure TA, °B and SO2; Melissa, an undergraduate lecturer who makes experimental wines, helped me fill, cork and cap a bottle of Shiraz to take home; and Sebastian, from Belgium, showed us some of the small-scale equipment used for de-stemming and crushing together with their use.
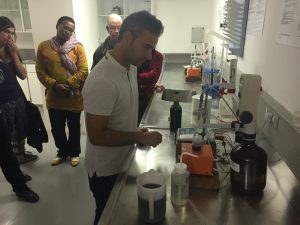
It was fascinating to see typical winery equipment in small scale. There were medium-sized and baby stainless steel fermentation tanks – the smallest I had ever seen – as well a display and information about available yeasts.


The lunch break followed the welcome laboratory visit and I went to the Student Union building with some of my fellow students who knew where it was a short walk away. I returned to the lecture Hall after and the Wine Prof continued with the winemaking process. It was time to consider MLF, having covered alcoholic fermentation in the morning. MLF, which usually occurs towards the end or after alcohol fermentation, differs in that no alcohol is produced. Lactic acid bacteria (LAB) convert malic acid into lactic acid which influences the taste and composition of the wine. The chemistry aside, malic acid has the highest acid taste and MLF can reduce it to almost zero. Diacetly is an important MLF by-product that has the buttery flavour associated with Chardonnay. It is known to reduce the flowery and fruity flavours of white wines (hence it is not used for Sauvignon Blanc or Chenin Blanc). It can also reduce the red colour of red wine to a more violet form as the pH increases.

MLF can be stimulated in many ways: maintaining the alcohol level at or below 14% (higher kills the LAB); keeping SO2 levels low; keeping the temperature at 19-22°C; maintaining a pH above 3.2 but not too high; adding LAB and bacterial nutrients; and filling containers to prevent acetic acid bacteria formation. Conversely, MLF can be inhibited by CO2 addition, lowering temperatures to 11-13°C and reducing the pH to below 3.3. MLF measurement is best arranged using a commercial laboratory.
Racking was mentioned above and is done more than once during the winemaking process to remove unwanted solids and compounds. It clarifies the wine and helps move wine from one container to another. White wine is racked after the grapes are crushed and the juice settled, after alcoholic fermentation (to separate it from the yeast lees), to separate bentonite after fining, and after cold stabilisation (crystal removal). Red wine is racked at the end of alcoholic fermentation, after MLF, and to remove sediment whilst ageing. The Wine Prof offered 2 tips: first, for white wines, to keep the receiving end of the hose end below the wine surface and whilst a little warmer (to reduce O2 uptake) and, second, for white and red wine racking, to attach a short metal rod to the end of the hose in the emptying container so as to avoid sediment disturbance. Barrels need be regularly topped up too due to evaporation (10-20 l per barrel) and absorption in new barrels (5-7 l).
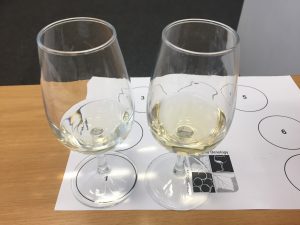
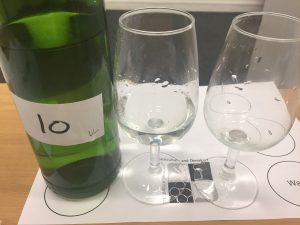
The final hour of the afternoon, until 4.30pm, was a tasting in the Tasting Laboratory of some of the wines made by the students and of the Collatio wine range. The student wines were made in small batches of 20-50 l. Each flight was put together to show a particular characteristic: Flight 1 compared 2 Chenins Blanc, one with clarified juice that was fruitier than the one with turbid juice. The second flight consisted of a green, herbaceous Sauvignon Blanc made using grapes from a cool area (Durbanville) and one made in a tropical style from warmer Boschendal.
The next flights of wines each were from the Collatio Range. ‘Collatio’ means to ‘compare’ in Latin and the wines are the brainchild of the Wine Prof. The aim is to produce a single barrel each of paired wines that are near identical but for one winemaking parameter that is different. It is a great initiative for the student and enthusiast and one rarely available to the non-professional taster and drinker. I recall well the joy and interest in tasting 2 virtually identical Cabernets Franc at Rainbow’s End that differed only in clone. I remember well too tasting Chardonnays from sandstone and limestone soils at De Wetshof.

The first pairing were 2 Chenins Blanc made from old bush vines that followed the same winemaking process in separate old 225 l barrels until the end of alcoholic fermentation. Thereafter, the first did not undergo MLF while the second did. Both wines were lees aged for 10 months before bottling. The first wine was more citrus with sweet tropical notes, higher acidity and a cleaner mouthfeel than the second, which was less complex with baked apple flavours, less acidity, and a creamier texture.
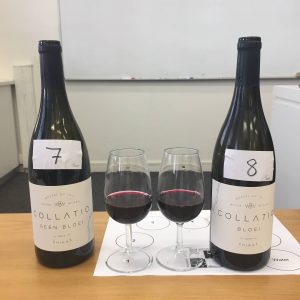
Shiraz from the Swartland made up the second Collatio pairing. The first was fruitier and a deeper red whereas the second wine was slightly deeper in colour, less fruity and bitterer in taste. The Wine Prof explained that the first wine was made from crushed and de-stemmed grapes in old French barrels. The grapes in the second wine had been similarly crushed and de-stemmed but had had 20% of the juice ‘bled’ to concentrate the must.
Two flights remained for tasting. Flight 5 compared 2 Pinotage, one made in stainless steel – paler in colour, smoother and greener and with a lighter mouthfeel – and one made using coffee-flavoured oak staves – deeper colour, fruitier, sweeter on the nose and with toasty flavours. Last up, and with my palate and mind tired from the full day, were 2 Merlots. These were made from grapes from the Remhoogte estate that had different sugar ripeness levels. Wine 1, picked earlier at 23 °B, was lighter in style with sweeter fruits. The grapes for the second wine were picked 10-14 days later, at 25 °B, to make for a fuller and more stringent, tannic wine.
The last formal decision of the day was to order some Collatio wines. These were R240 per pair or R700 for 3 pairs, the other being Cabernet Sauvignon with 7 and 35 days skin contact after alcoholic fermentation and before pressing. I ordered the 3 pairs and shall use them for a special tasting in due course. It was by now 4.30pm and I had a few hours to kill before the optional evening session that started at 6.30pm.
Cheese and Wine
The 2 hour break was awkward for a number of reasons. It was long enough to want to do something but too brief to find somewhere for a meal, alone. I do not well know Stellenbosch and the Department of Viticulture and Oenology is not in the heart of the city. Added to which, by the time I found a car park in the city centre, the shops had pretty much all closed. It was that twilight hour when coffee shops are closed and restaurants not yet open.
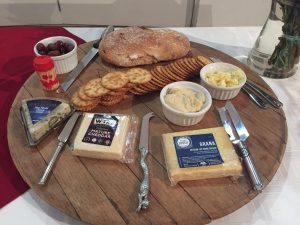
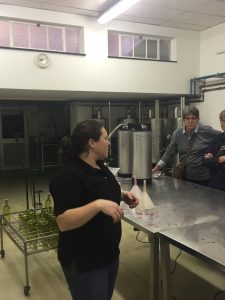
However, I returned to the lecture Room ready for the voluntary evening event that was attended by about 2/3 of the Course. Cheese and wine, after all, are a perfect pairing. The speaker was Leon ‘the Milkman’ Westhuizen – a former student colleague of the Wine Prof – who was ably assisted by his wife, Elaine.

The room was set out with platters of cheeses of various kinds, biscuits and glasses for the accompanying wines. The cheeses included mature cheddar, grana, feta and blue cheese. I chose not to take notes because, first, I had taken enough for the day and, second, I intended to participate in the 2-day cheese-making course (Afternote: see my Course review for 17-18 January 2019). I was hungry too and the little squares of cheese, small as they were, were begging to be tasted.

Larger than life Leon was as passionate and knowledgeable about making cheese as he was unapologetically politically incorrect. Few, fortunately, were offended even if many of his jokes were close to the bone. He opened by talking about the constituents of milk – fat, protein and lactose – together with the 2 main classes of bacteria used for the starter culture when making cheese (mesophile and thermophile). Cheese is set by a combination of heat and acidity using either rennet or acid or, for most cheeses, a combination.

Leon made it all sound easy and that made me even more determined to learn from him on a 2-day course. The cheeses were tasty and I probably ate more than my fair share. The Wine Prof had brought 2 wines to accompany. Both were made under the Die Laan label that is made by the University. One was a refreshing Elgin Viognier and other a Stellenbosch Pinotage, a nod perhaps to a different Wine Prof, Professor Perold who created Pinotage in 1925 from a cross between Cinsault and Pinot Noir.

It was almost 9.00pm when we finished. It had been a long day and I was pleased, though full of knowledge, to return home to Cape Town.
Sunday
‘There is no peace for the wicked’, so they say and so it was up early again to make it back to Stellenbosch for the final day of the course, starting again at 8.30am. It was to be a shorter day, however, with a 2.30pm finish.
The Wine Prof continued from where he had ended yesterday (racking) to move to the next winemaking step, that of fining. Fining is the process whereby certain unwanted compounds are removed prior to the final stages before bottling (white wines) or ageing (red wines). These include proteins, phenolics and metals. Several agents are used and a pre-fining trial is required to calculate the concentrations needed of the relevant fining agent. Bentonite (a clay) is commonly used to remove proteins.
Gelatine takes away the more bitter and astringent phenolics. I was intrigued to learn that potato can be used in vegan or vegetarian wines. Egg whites, as the Romans discovered centuries ago, can soften red wine and work quickly. The thought of beating 4-5 egg whites with some salt and adding them to a 225 l barrel seemed slightly surreal. PVPP reacts with the smaller phenolic compounds and often used to prevent ‘pinking’ (discolouration) of Sauvignon Blanc. I had not thought of the yeast lees itself having a fining role which is to add freshness to older, tired white wines.
The rest of the morning and until coffee break covered the use of oak in winemaking. This is a large subject and the Wine Prof began by talking about the different types of oak used to make barrels. If ever one thought that a barrel is a barrel is a barrel then now was the time to be corrected. Different Quercus (oak) species are grown in different countries and regions. There are 2 species in each of the Burgundy/Limousin and Central France/Vosges regions, for example. They all have different properties according to their grain density (and hence rates of micro-oxidation) and lactone or eugenol flavour compounds. I learned that there are between 500,000 and 1 million hectares of oak forest that it takes 1 hectare per year to make a single barrel.

Other factors to consider when choosing a barrel include: the type of oak (American versus French; Limousin versus Vosges versus Central French oak); the ageing of the oak (natural versus oven-aged); toasting intensity (light versus medium versus heavy); barrel size (50 versus 225 versus 300 l); barrel age (new versus 2nd fill versus 3rd fill versus 4th fill); the absence of leakage or internal blisters; and bung stopper opening and type. As the Wine Prof spoke, I was reminded of winemaker Wilhelm Pienaar at the Hermanuspietersfontein Wine Cellar telling me how he could distinguish the taste of wines matured in each of his 26 different barrels.
Red and white wine ageing were addressed separately. Red wine is transferred to barrels just before or after MLF. Wine type and style must match the barrel type and age. The oak aromas in new barrels can be too dominant which is why a combination of 2nd and 3rd oak barrels is often used. The wine must be regularly checked (monthly) for taste and to top up, test free SO2 and VA levels, maintain the correct temperature (around 18°C) and humidity, and to maintain general cleanliness, including around the bungs.

Oak barrels are also used to age white wines, notably Chardonnay, which may also be fermented in the same barrels. Barrels are filled to around 70% during fermentation to stop juice bubbling out at the top and to allow headspace for CO2 freely to escape. The same barrel can topped up and be used for ageing (after racking). Decision is needed as to whether to age on the lees for a ‘fatter’ style during which regular stirring (every 2-4 weeks) is needed to assist autolysis of the yeast. Riper fruited wines such as Viognier and Chenin Blanc benefit also from barrel ageing.
The Wine Prof outlined some of the barrel alternatives – oak chips, staves, dust and exogenous tannins – and their advantages and disadvantages. The final topic on ageing included the essential and practical matters such as: exterior and interior barrel inspection (for condition/integrity and mould/odours, respectively); the preparation of new barrels (soaking and leak checks); barrel cleaning and storage; and the preparation of used and stored barrels.

The morning coffee break beckoned and it was time to return for the final session of the Course. This took us from the made wine to bottling, beginning with the different preservatives that are added to wine to prevent it from being spoiled. SO2 is an important additive and has been used since Egyptian times due to its anti-oxidant and anti-microbial properties. I will not go into either the forms of SO2 (bound, free and total) or the calculation to raise the level of SO2 from the measured to required amount for a particular concentration of potassium metabisulphate. It is complex, even with use of table in the Course notes, and the kind that I have to sit quietly alone to calculate.
Wine stabilisation (whether by bentonite or cold – 0-4 °C for 7-10 days) to remove protein and crystals was much simpler to understand. Regular testing is essential during the month and weeks before bottling. Filtration is pretty well the final step before bottling. Again, a number of techniques can be used: depth filtration, sieve filtration or reverse osmosis. Not all of these methods are cost-effective for the garagiste. The aim is to remove unwanted material, ranging from bits of grape flesh to yeast and bacteria cells, without stripping the wine of its flavours.

The wine almost made, so to speak, the Wine Prof briefly touched on fortified, late harvest and dessert wines, together with sparkling wines. I sensed for most this was very much in the future. For me at least, the aim is to make a decent table wine before progressing to anything exotic. The Wine Prof closed – fittingly – on bottle closure methods and labelling. He mentioned the pros and cons of corks and screw caps together with capsule and label types.
The Course complete, save for some useful tips about what to do when things go wrong and details of local equipment and material suppliers which are in the Course notebook, we returned for a final time to the Tasting Laboratory. One of the students had brought a bottle of de-alcoholised Lautrus Sauvignon Blanc for tasting.

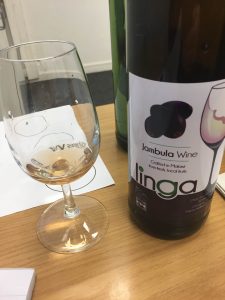
We also had a tasting of the Linga Fruit Wines from Malawi. I had tasted before during a holiday to the country when I visited this home-based producer. The fruit wines are made from guava, plum, rosella, jambula, mulberry and white peach, some of which we tasted. The wines are made in 200 l plastic drums and aged for over a year. They taste nothing like conventional wine, even though with an alcohol content of 13.5%, and are heavily oxidised. We finished with a de Laan Cabernet Sauvignon that was ripe and fruity.
I had thoughly enjoyed the Course but now it was time to return home to Cape Town for the rest of my weekend.
Conclusion
I initially gave the ‘Small Scale Course in Winemaking’ aka the ‘Garagiste Course’ a rating of 3.5/5. I was not entirely comfortable with the score but did not know precisely why. As ever, there was much to enjoy and some things to improve upon. There was my advance perception and pre-conception to consider too.

I would have liked to have heard more at the outset about the history of the garagiste movement both in France and South Africa. I appreciate that the Course is a practical one and that not all might want to hear about but the story is fascinating and worthwhile hearing. That is why, from previous reading and research, I included it at the start of this review. There was the minor irritation about the 2 hour time before the evening social that perhaps could have been brought forward with just a half hour gap between. Refreshments each day on arrival would have been welcome (there were none) given the distance that many travelled to the course and the Course fee.
On the plus side, the Course was extremely comprehensive as was the accompanying Course book. The content of the book and lectures was clear and logical. The Wine Prof presented well and showed just the right balance between authoritative academic and approachable speaker for a subject which is a hobby or potential one. I liked the detail too in the notes, of concentrations and temperatures, of volumes and methods, which added much to the practical advice and assistance. The economics of small-scale winemaking – and especially in the vineyard – was revealing and fascinating. I should add that the evening session on cheese-making was extremely worthwhile also.

My rating reticence – I rated 4/5 on reflection – was due to a combination of factors. The first stems from my Cape Wine Academy training which few of my Course colleagues will have done before. I had studied viticulture and viniculture at both Certificate and Diploma level and so I knew the basics and the steps of winemaking. This meant that I learned less than otherwise I might have done. Last, I had expected more of a hands-on Course with much less time in the classroom. I guess I had thought there would be more learning by doing albeit without thinking through just how this could be accommodated into the 3 days. That is my failing rather than any by the Wine Prof or the Department of Viticulture and Oenology.
I am excited for the future. I wonder when I shall be able to taste my own cheese and sip my own wine …!